5. BSP
The Board Support Package is composed by a set files, patches, recipes, configuration files, etc. This chapter gives you the information you need when you want to customize something, fix a bug, or simply learn how the all thing has been assembled.
5.1. U-boot
This chapter explains how to compile the u-boot.
5.1.1. Get the sources
The bootloader used by Pengwyn board is U-Boot. If you need to modify the bootloader or to recompile it you have two ways to get the sources:
- use the sources you find in Yocto build directory after having compiled at least once a yocto image, or
- download the official u-boot release, than patch it with the BSP patches for Pengwyn board.
Anyway, we will assume in this guide that u-boot sources will be copied to:
/home/architech/Documents/u-bootand such directory does not yet exists on your PC. Of course, you are free to choose the path you like the most for u-boot sources, just remember to replace the path used in this guide with your custom path. So, where can we get the sources?
- From Yocto sources
The first way is based on the sources set up by the Yocto build system. However, it is never advisable to work with the sources in the Yocto build directory, if you really want to modify the source code inside the Yocto environment we strongly suggest to refer to the official Yocto documentation. To avoid messing up Yocto recipes and installation, it is desirable to copy the patched u-boot sources you find in the build directory elsewhere. The directory we are talking about is this one:
/home/architech/architech_sdk/architech/pengwyn/yocto/build/tmp/work/pengwyn-poky-linux-gnueabi/u-boot-ti-staging/2014.07-r7+gitrAUTOINC+7e537bfdd2/git/Replace:
/home/architech/architech_sdk/architech/pengwyn/yocto/build/all over this chapter with your custom build directory path if you are not working with the default SDK build directory.
- From the official u-boot release
The second way is to get the official U-Boot sources and patch them with Pengwyn BSP patches. Pengwyn board uses U-Boot version 2014.07, which can be downloaded from:
cd /home/architech/Documents
git clone -b ti-u-boot-2014.07 git://git.ti.com/ti-u-boot/ti-u-boot.git
mv ti-u-boot u-boot
cd u-boot
git checkout 7e537bfdd261bf8bf444f3ac4d1be3db4ee124e8
5.1.2. Build U-boot
Patches are in the Yocto meta-layer meta-pengwyn. You can use them right away if you are working with the SDK:
patch -p1 -d /home/architech/Documents/u-boot/ < /home/architech/architech_sdk/architech/pengwyn/yocto/meta-pengwyn/recipes-bsp/u-boot/u-boot-ti-staging-2014.07/0001-pengwyn.patchHowever, if you are not working with the official SDK the most general solution to check them out and patch the sources is:
cd /home/architech/Documents
git clone -b dizzy https://github.com/architech-boards/meta-pengwyn.git
patch -p1 -d /home/architech/Documents/u-boot < /home/architech/Documents/meta-pengwyn/recipes-bsp/u-boot/u-boot-ti-staging-2014.07/0001-pengwyn.patch
Configuration and board files for Pengwyn board are in:
/home/architech/Documents/u-boot/board/ti/am335x/*
/home/architech/Documents/u-boot/include/configs/pengwyn.h
Suppose you modified something and you wanted to recompile the sources to test your patches, well, you need a cross-toolchain. To use it to compile the bootloader or the operating system kernel run:
source /home/architech/architech_sdk/architech/pengwyn/toolchain/environment-nofsthen you can run these commands to compile it:
cd /home/architech/Documents/u-boot/
make pengwyn_config
make -j <2 * number of processor's cores> pengwyn
Once the build process completes, you can find u-boot.img and MLO file inside directory /home/architech/Documents/u-boot.
5.2. Linux Kernel
Like we saw for the bootloader, the first thing you need is: sources. Get them from Bitbake build directory (if you built the kernel with it) or get them from the Internet.
Bitbake will place the sources under directory:
/path/to/build/tmp/work/pengwyn-poky-linux-gnueabi/sitara-linux-ti-staging/3.14.26-r22g+gitrAUTOINC+2489c022b2/gitIf you are working with the virtual machine, you will find them under directory:
/home/architech/architech_sdk/architech/pengwyn/yocto/build/tmp/work/pengwyn-poky-linux-gnueabi/sitara-linux-ti-staging/3.14.26-r22g+gitrAUTOINC++XXX/gitIf you didn’t build them already with Bitbake or you just want to do make every step by hand, you can always get them from the Internet by cloning the proper repository and checking out the proper hash commit:
cd ~/Documents
git clone -b sitara-ti-linux-3.14.y git://git.ti.com/sitara-linux/sitara-linux.git
cd sitara-linux
git checkout 2489c022b2932432606f897741a71b712e6dbe77
and by properly patching the sources:
cd ~/Documents
patch -p1 -d sitara-linux/ < /home/architech/architech_sdk/architech/pengwyn/yocto/meta-pengwyn/recipes-kernel/linux/sitara-linux-ti-staging-3.14.26/0002-pengwyn.patch
cp /home/architech/architech_sdk/architech/pengwyn/yocto/meta-pengwyn/recipes-kernel/linux/sitara-linux-ti-staging-3.14.26/defconfig ~/Documents/sitara-linux/arch/arm/configs/pengwyn_defconfig
However, if you are not working with the official SDK the most general solution to check them out and patch the sources is:
cd ~/Documents
git clone -b dizzy https://github.com/architech-boards/meta-pengwyn.git
git clone git://git.yoctoproject.org/meta-ti.git
cd meta-ti
git checkout 56ea9223d7a3d3da38dd4fef10b4dfeb0667992d
patch -p1 -d sitara-linux/ < meta-pengwyn/recipes-kernel/linux/sitara-linux-ti-staging-3.14.26/0002-pengwyn.patch
cp meta-pengwyn/recipes-kernel/linux/sitara-linux-ti-staging-3.14.26/defconfig sitara-linux/arch/arm/configs/pengwyn_defconfig
Now that you have the sources, you can start browsing the code from the following files:
~/Documents/sitara-linux/arch/arm/boot/dts/pengwyn-common.dtsi
~/Documents/sitara-linux/arch/arm/boot/dts/pengwyn-dvi.dts
~/Documents/sitara-linux/arch/arm/boot/dts/pengwyn-touch.dts
For build the kernel source the script to load the proper environment for the cross-toolchain:
source /home/architech/architech_sdk/architech/pengwyn/toolchain/environment-nofscd ~/Documents/sitara-linux
make pengwyn_defconfig
make menuconfigand to compile it:
make -j <2 * number of processor's cores> uImageIf you omit -j parameter, make will run one task after the other, if you specify it make will parallelize the tasks execution while respecting the dependencies between them. Generally, you will place a value for -j parameter corresponding to the double of your processor’s cores number, for example, on a quad core machine you will place -j 8.
Once the kernel is compiled, the last build to do is the dtb file. This file permits at the boot time to configure the kernel with a specific hardware configuration. So if you are using a touchscreen you will build the pengwyn-touch.dts file else if you are using a display with dvi connector will be pengwyn-dvi.dts file. In the same directory where you have compiled the kernel launch the command:
make pengwn-touch.dtbor
make pengwyn-dvi.dtbBy the end of the build process you will get uImage under arch/arm/boot and pengwyn-touch.dtb or pengwyn-dvi.dtb under arch/arm/boot/dts directories.
5.2.1. Build from bitbake
The most frequent way of customization of the Linux Kernel is to change the .config file that contains the Kernel options. Setup the environment and run:
bitbake virtual/kernel -c cleanall
bitbake virtual/kernel -c menuconfig
a new window, like the following one, will pop-up:
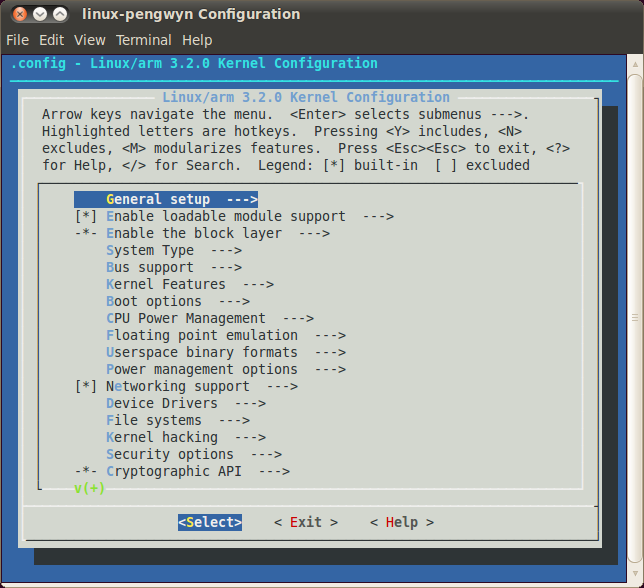
follow the instructions, save and exit, than you ready to generate your preferred image based on your customized kernel. If you prefer, you can build just the kernel running:
bitbake virtual/kernelAt the end of the build process, the output file (uImage.bin), along with the built kernel modules, will be placed under tmp/deploy/images/pengwyn/ inside your build directory, so, if you are building your system from the default directory, the destination directory will be /home/architech/architech_sdk/architech/pengwyn/yocto/build/tmp/deploy/images/pengwyn/.
5.3. Meta Layer
A Yocto/OpenEmbedded meta-layer is a directory that contains recipes, configuration files, patches, etc., all needed by Bitbake to properly “see” and build a BSP, a distribution, a (set of) package(s), whatever. meta-pengwyn is a meta-layer which defines the customizations to make to TI’s AM335x BSP and Yocto/OpenEmbedded in order to get a working system, tailor made of Pengwyn.
You can get it with git:
git clone -b dizzy https://github.com/architech-boards/meta-pengwyn.gitThe machine name for Pengwyn is pengwyn.
The strictly BSP related recipes are located under:
meta-pengwyn/recipes-bsp/u-boot/
meta-pengwyn/recipes-bsp/flash/
meta-pengwyn/recipes-kernel/linux/
The other recipes are there just to customize other aspects of the system or to offer some facility to help you easily manage some task, for example, working with flash memory or partitions.
Pengwyn is powered by a NAND memory, big enough to place a full featured root file system inside of it. However, you might not be interested in how to place the file system inside of it from the beginning and how to mount and unmount it inside your file system. There is a recipe inside meta-pengwyn, pengwyn-flash-utils, that will install three scripts inside the target file system to make the aforementioned tasks easy:
- pengwyn_to_flash
- pengwyn_mount_flash
- pengwyn_umount_flash
pengwyn_to_flash takes as input files, cleans and formats the NAND flash memory, and finally takes the files you gave him to setup the file system. For more information just run:
pengwyn_to_flash -hfrom Pengwyn shell.
pengwyn_mount_flash lets you mount the flash memory partition inside your filesystem (under /mnt/flash) without any effort and, likewise, pengwyn_umount_flash helps you unmounting the partition.
Remember that to install those scripts inside the target, you need to add meta-openmbedded/meta-oe meta layer to your bblayers.conf file. If you are working with Architech virtual machine, you don’t have to worry about that, everything is already in place.
pengwyn-flash-utils won’t be placed by default inside your file system, if you want it you need to add a line like this one to your local.conf file
IMAGE_INSTALL_append = " pengwyn-flash-utils"Probably the most comfortable way, at least at the beginning, to build a valid SD card is to use file .sdcard that Bitbake emits when builds an image. However, Bitbake prepares a final iso image to write to the medium without any knowledge of its size. If you write the image on an SD card, for example, the first thing you notice is that the file system does not fit the card.
5.4. Root FS
By default, Pengwyn’s Yocto/OpenEmbedded SDK will generate an image <name image>.tar.gz:
The .tar.gz file can be flattened out in your final medium partition (on SD card, flash memory) or on your host development system and used for build purposes with the Yocto Project.
If you want use a new SD card to unpack your image .tar.gz then read the following section else skip it.
5.4.1. How to create the SD card
This section describes the steps to be followed to create a standalone bootable system on SD card.
Ensure that the following is available:
- An SD memory card reader/programmer to copy files from the Linux Host. The SD card reader must be accessible from VirtualBox.
- An USB device to read and write a SD card.
Warning
Not all computer built-in readers can be used, use USB connected devices instead.
- An SD card
Warning
Your sd-card will be formatted and all the data contained in it will be lost forever!
- The tool scripts (download link pengwyn-tools-dizzy.tar.bz2) and decompress in a directory. eg:
mkdir -p /home/architech/Desktop/pengwyn-tools
tar -jxf pengwyn-tools-dizzy.tar.bz2 -C /home/architech/Desktop/pengwyn-tools- A Linux host with fdisk, sfdisk, mkfs.ext3 and mkfs.vfat utilities. If you are running the VM with Ubuntu pre-installed and the environment already in place, all the packages are already available.
- The files MLO, u-boot.img, zImage-pengwyn-dvi.dtb, zImage, (optionally) the kernel modules (modules-3.2.0-rX-pengwyn.tgz, where X is the revision number for the kernel modules, without any modification to the kernel configuration it should be 0) and the root file system with name ending with -pengwyn.tar.gz are available inside the images deploy directory (<build directory>/tmp/deploy/images/pengwyn/, if your build directory is the default one, then the deploy directory is /home/architech/architech_sdk/architech/pengwyn/yocto/build/tmp/deploy/images/pengwyn).
cd /home/architech/Desktop/pengwyn-tools
sudo ./fast-create-sdcard.sh
Note
5.4.2. How to build the SD card
- Run the VM on VirtualBox
- Connect your SD card reader to your computer than to the virtual machine, from VirtualBox menu select Devices → USB Devices → “your SDcard reader”.
- Insert the SD card into the adapter (in this example we are inserting an SD card already partitioned with a FAT and an EXT3 partition, that is the basic configuration for the Pengwyn board).
- Run the following command (sudo password: architech)
sudo fdisk -l

Disk /dev/sdb: 1971 MB, 1971322880 bytes
255 heads, 63 sectors/track, 239 cylinders
Units = cylinders of 16065 * 512 = 8225280 bytes
Sector size (logical/physical): 512 bytes / 512 bytes
I/O size (minimum/optimal): 512 bytes / 512 bytes
Disk identifier: 0x9bfa2153

Device Boot      Start         End      Blocks   Id  System
/dev/sdb1   *           1           9       72261    c  W95 FAT32 (LBA)
/dev/sdb2 11 239 1839442+ 83 Linux- Find the device name from fdisk command output, in this example is /dev/sdb.
- Run the script (in pengwyn-tools folder) that will prepare the SD card with all the needed files to run the system:
sudo ./fast-create-sdcard.sh+------------------------------------------------------------------------------+
| |
| This script will create a bootable SD card. |
| The script must be run with root permissions. |
| |
+------------------------------------------------------------------------------+
+------------------------------------------------------------------------------+
| LIST OF AVAILABLE DRIVES: |
+------------------------------------------------------------------------------+
# major minor size name
1: 8 16 1927168 sdb
Enter Device Number #:+------------------------------------------------------------------------------+
| |
| This script will create a bootable SD card. |
| The script must be run with root permissions. |
| |
+------------------------------------------------------------------------------+
+------------------------------------------------------------------------------+
| LIST OF AVAILABLE DRIVES: |
+------------------------------------------------------------------------------+
# major minor size name
1: 8 16 1927168 sdb
Enter Device Number #: 1
sdb was selected
sdb1 sdb2
72261 1839442
Mount the partitions
Emptying partitions
Syncing....
+------------------------------------------------------------------------------+
| Copying files now... will take minutes |
+------------------------------------------------------------------------------+
Copying boot partition
Copying file system partition
Copying modules
Syncing....
Un-mount the partitions
Remove created temp directories
Operation Finished
Press ENTER to finishAfter a writing operation use always sync command to make sure everything has been really written to the SD card:
sync